If you catch yourself daydreaming about starting an online store, now is the time.
According to online shopping statistics, an estimated 2.14 billion people will shop online in 2021. That’s just over a quarter of the entire world.
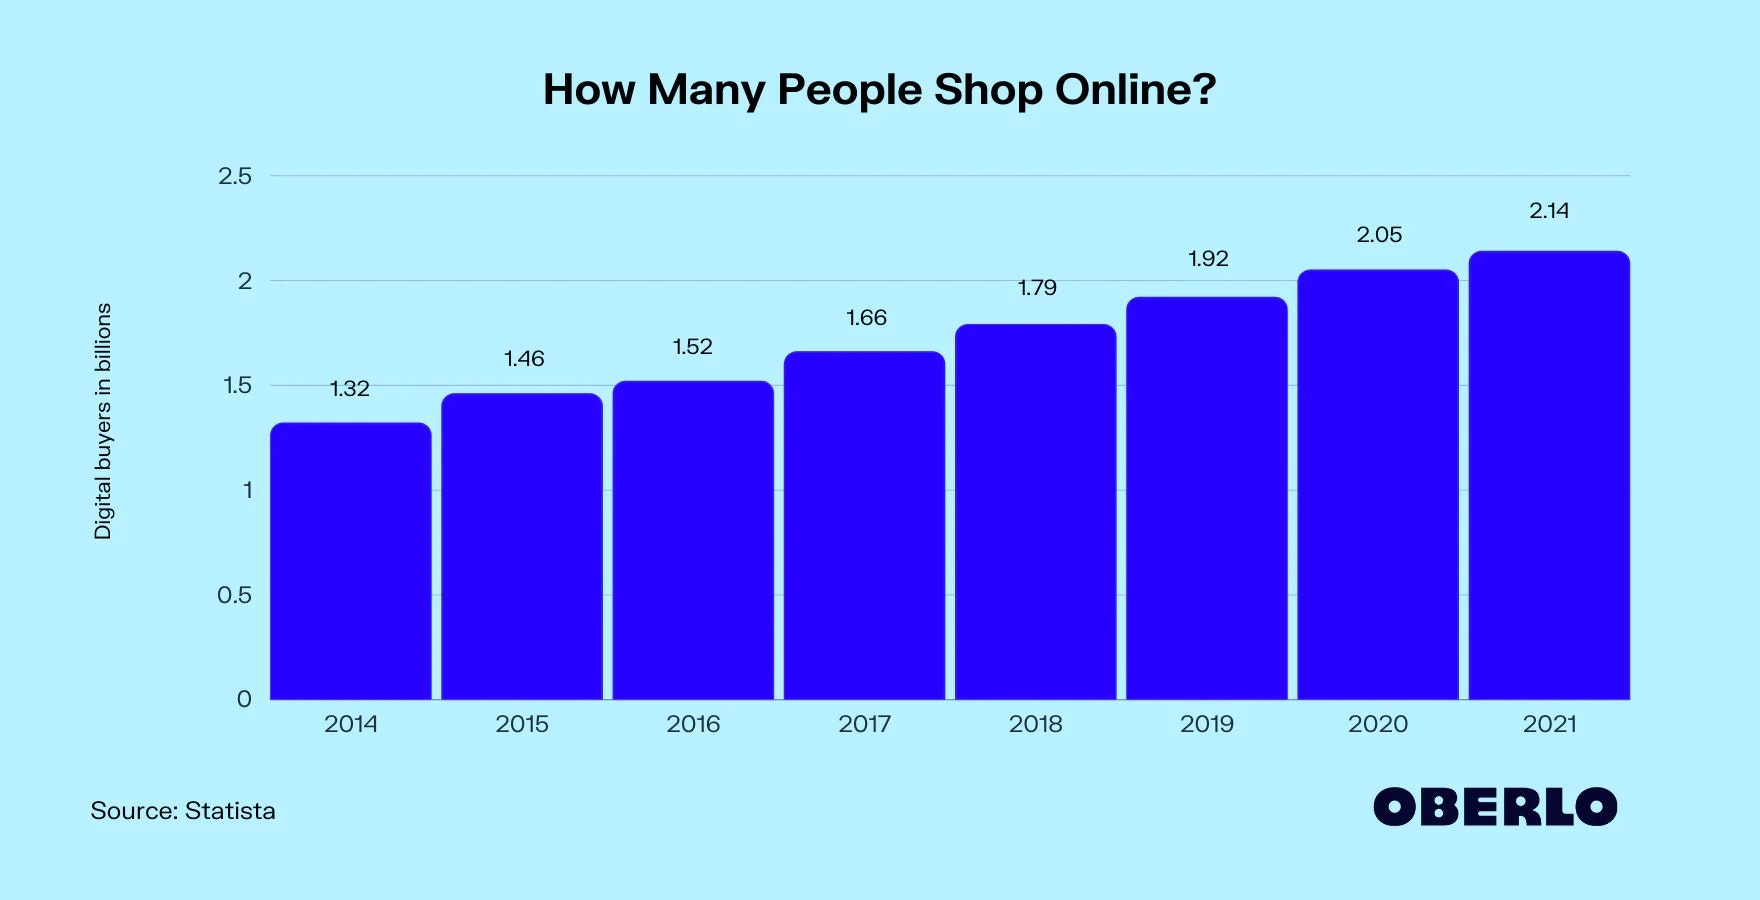
Online shopping has been steadily growing and it shows no sign of stopping.
And neither should you!
The good news is that setting up an online store is easier than you might think. In this article, we’re going to look at the key steps you need to take to have your ecommerce store up and running with minimal time and effort.
Before we jump in, let’s look at the steps we’ll cover…

Don’t wait for someone else to do it. Hire yourself and start calling the shots.
How to Build an Online Store From Scratch
- Sign up for Shopify
- Create Your Product Pages
- Build Out Other Key Pages
- Pick Your Theme and Design Settings
- Set up Shipping, Taxes, and Payments
- Add the Final Touches
- Launch That Baby!
Ready? Let’s go.
How to Open an Online Store Step by Step
1. Create a Shopify Account
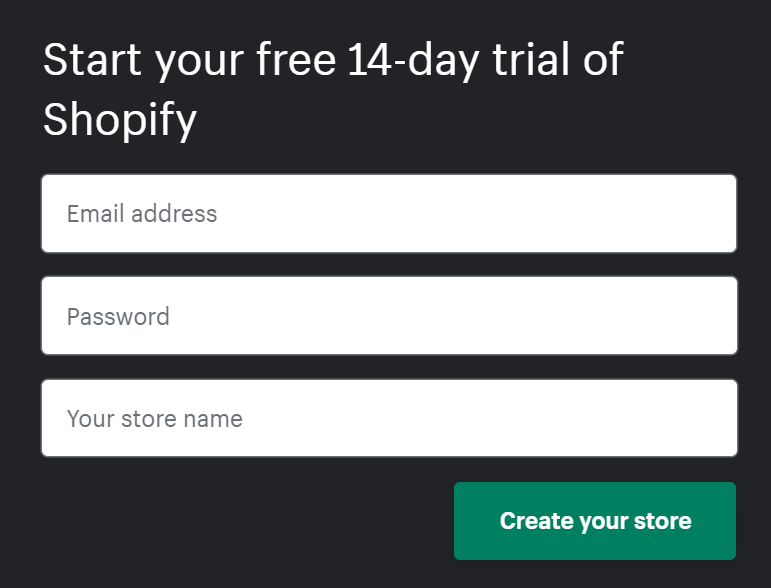
Let’s start with the beginning: sign up for your free 14-day trial of Shopify. You’ll have access to all the features you need to build a functional store. Then, when you’re ready, you can upgrade to a paid account and make your store live.
Signing up is simple and requires only a few minutes. You’ll need to answer a few questions, like your name, address, and a couple of questions about what you’re trying to accomplish with your store.
You’ll also need to come up with a unique store name that’s never been used before. This will be your domain, like www.your-store-name.myshopify.com.
If all your best ideas are taken, don’t worry — this will only live on in the backend of your store once you connect a custom domain (which we’ll cover later in step 6).
Once you’re in your shiny new account, take a few minutes to get acquainted. Click all the tabs and see what you find.
2. Build Your Product Pages
The next step for starting an online store is to add your products. You can do this by clicking the Add product button, which you can find directly on your dashboard or in the left navigation panel under Products.
Here’s a quick checklist for what makes a good product page:
Title
Come up with a unique name for your product. You can inject some creativity, but make sure the name makes sense to people who are looking for this type of item.
Description
A thoughtful product description can make or break your store’s performance. Be thorough: tell your shoppers all the key details so they don’t have any unanswered questions.
Here’s another place to inject creativity — add some brand personality and paint a picture for how your product will improve their life.
Media
If possible, take your own product photos (you can even use a smartphone!). Make sure they’re high quality and that your overall aesthetics and “feel” are consistent across all of your store’s products.
Include multiple photos that show different angles and levels of detail so your shoppers can visualize what it’s like to have it.
Search engine listing preview
This is the page title and description that shows up on a search engine results page (SERP), like Google. Choose engaging text here so that people know what’s on the page.
Bonus points if you can incorporate keyword research to boost your search engine optimization (SEO) rankings.
For more tips on how to create killer product pages, check out our ebook: The Ultimate Guide to Building Powerful Product Pages.
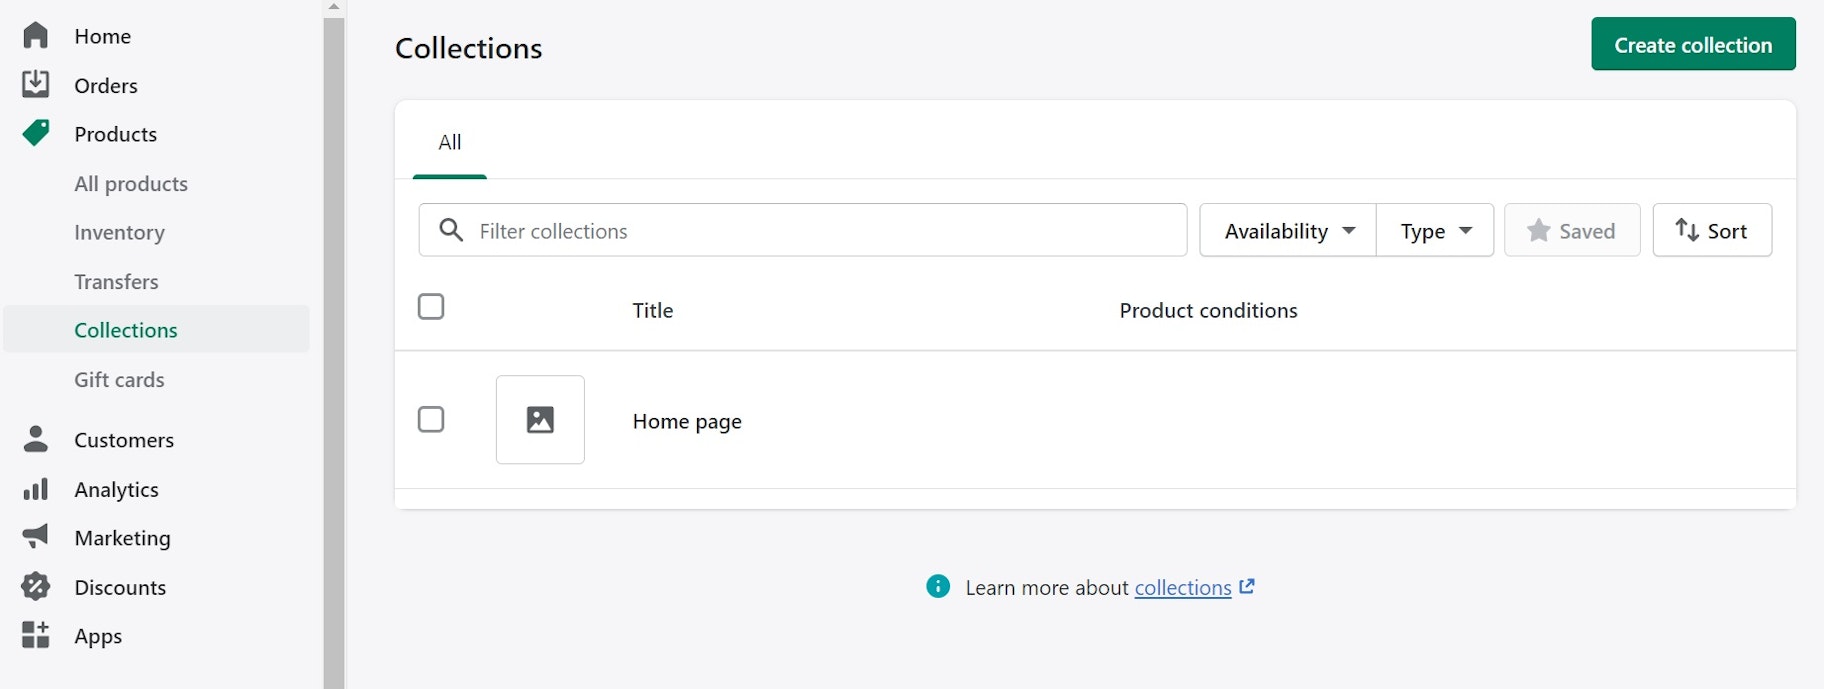
If you have groups of relevant products, you might also want to consider collections. For example, if you’re a clothing store that sells men’s, women’s, unisex, and children’s clothing, consider creating a collection for each one.
This will help shoppers more easily navigate to the products that are most relevant to them. And this ease of shopping leads to more sales!
You can create collections by going to Products > Collections.
3. Add More Key Pages
In addition to your core product pages, you’ll also need the “extras” you find on other sites. These include pages like:
- About. Bring your brand story to life. Show them who you are and what you’re all about. More importantly: show them that you understand their needs and wants, you align with them, and you’re ready to fill those shoes.
- Contact. Nobody likes a mystery brand that goes silent when you need help. Make it easy for them to reach you by providing a customer service email at the very least. Show this prominently so they don’t have to dig.
- FAQ. Not necessary, but a nice-to-have. Help answer any questions before they even ask them. As time passes, take note of the questions your customers often ask, then add them here. It will save everyone time in the long run — and it will save you on customer service resources.
- Legal and policy pages. It’s critical for you to have these — for your customers’ sake and your own. Be sure to create separate pages for your Privacy Policy, Shipping Policy, Refund Policy, and Terms and Conditions. Include these clearly in your website’s footer.
Shopify has awesome tools to help you generate your legal and policy pages (along with loads of other tools). Check them out here.
To create these pages, go to Online Store > Pages.
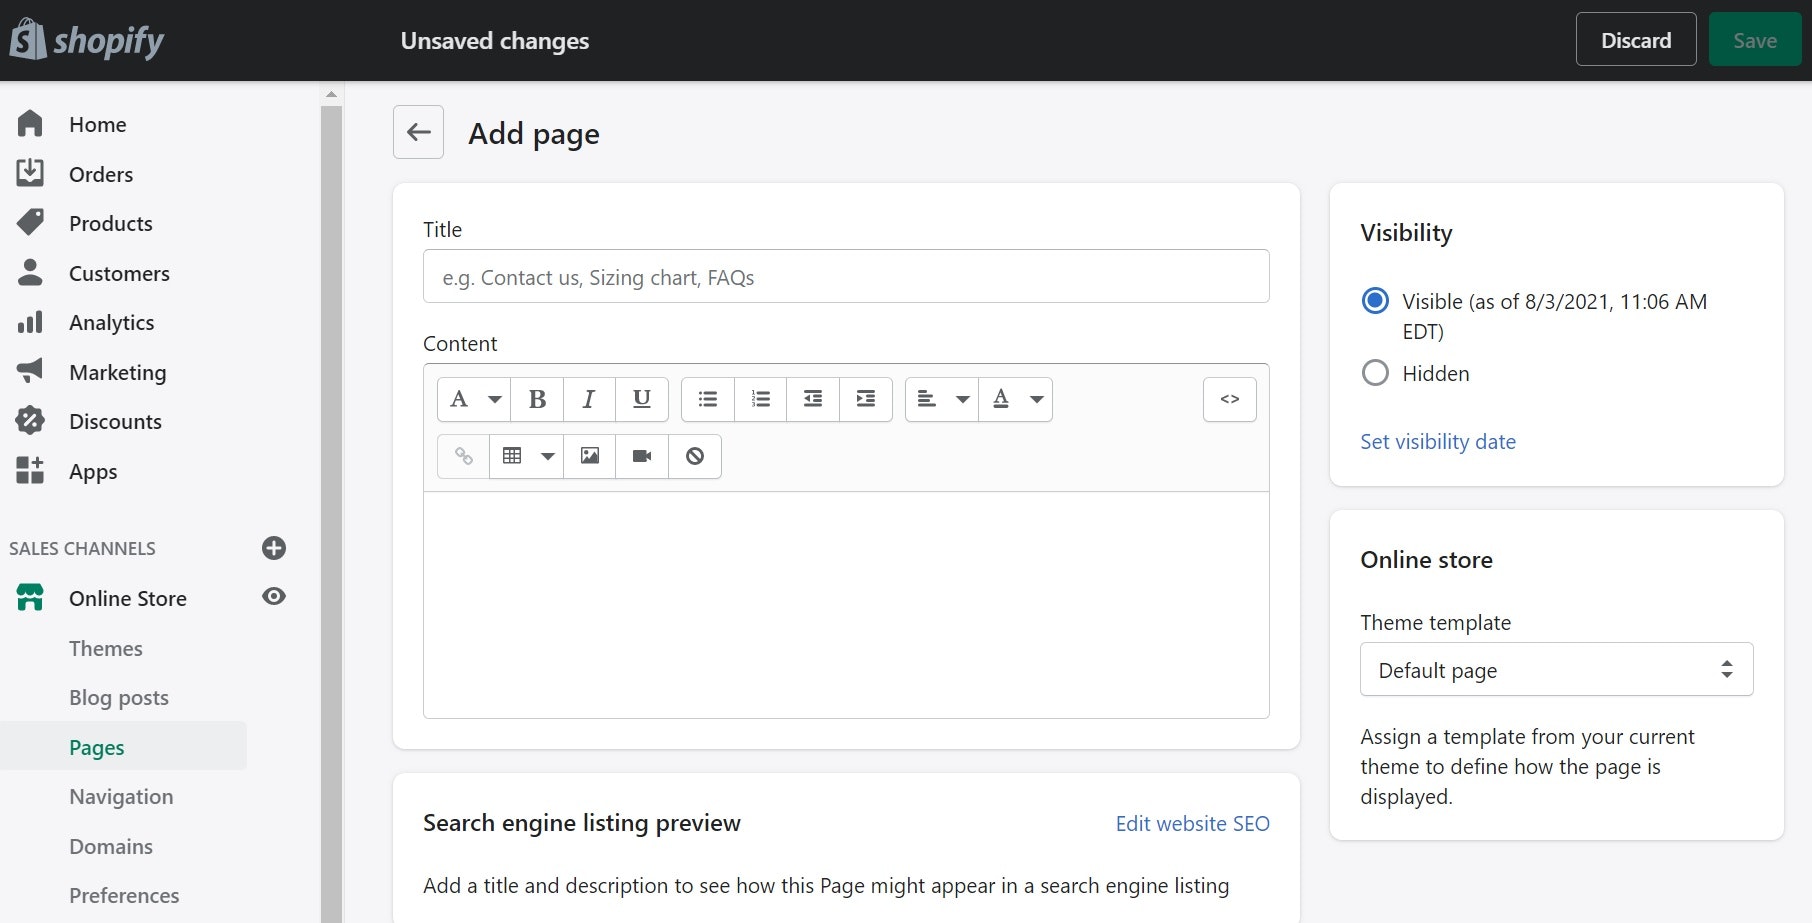
Add the title, content, and search engine listing preview for each page.
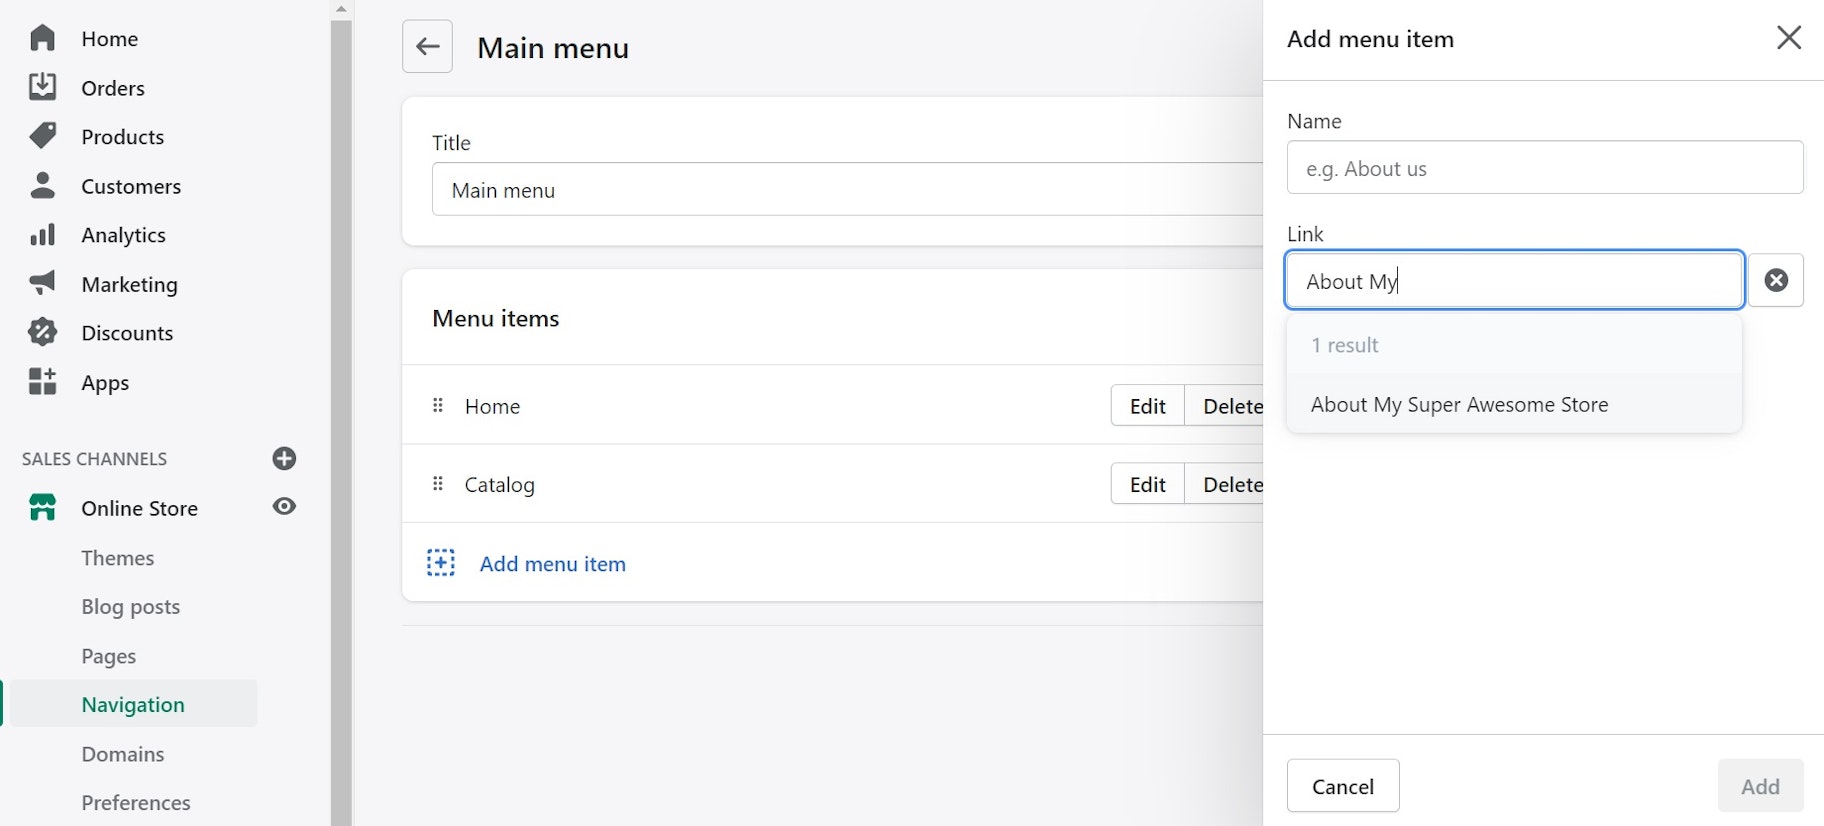
When you’re done, add these key pages to your website’s main navigation and footer. Go to Online Store > Navigation. Click Main menu or Footer menu depending on which menu you’d like to edit.
Click Add menu item, then in the Link section, type the name of the page you’ve saved. Click it when it pops up. Repeat until you’ve added everything (including your collections).
Boom.
4. Choose a Theme and Start Designing
Shopify makes it easy for anyone to build a store online, even if you don’t have any coding or design experience. The theme store has tons of pre-designed themes to choose from, and they suit every budget. (Did someone say free themes?)
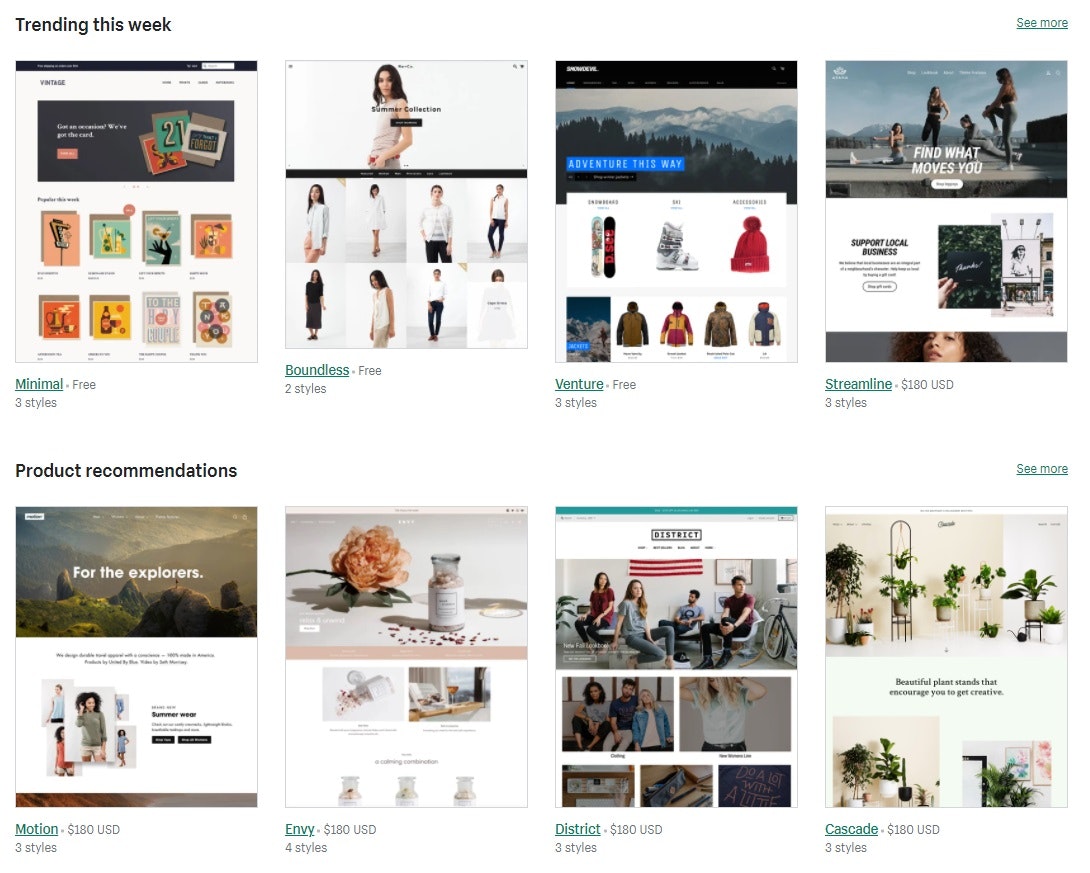
All you need to do is pop in your products, pages, and store branding. You can customize theme fonts and colors based on your unique branding elements. To customize your theme, go to Sales Channels > Themes > Customize.
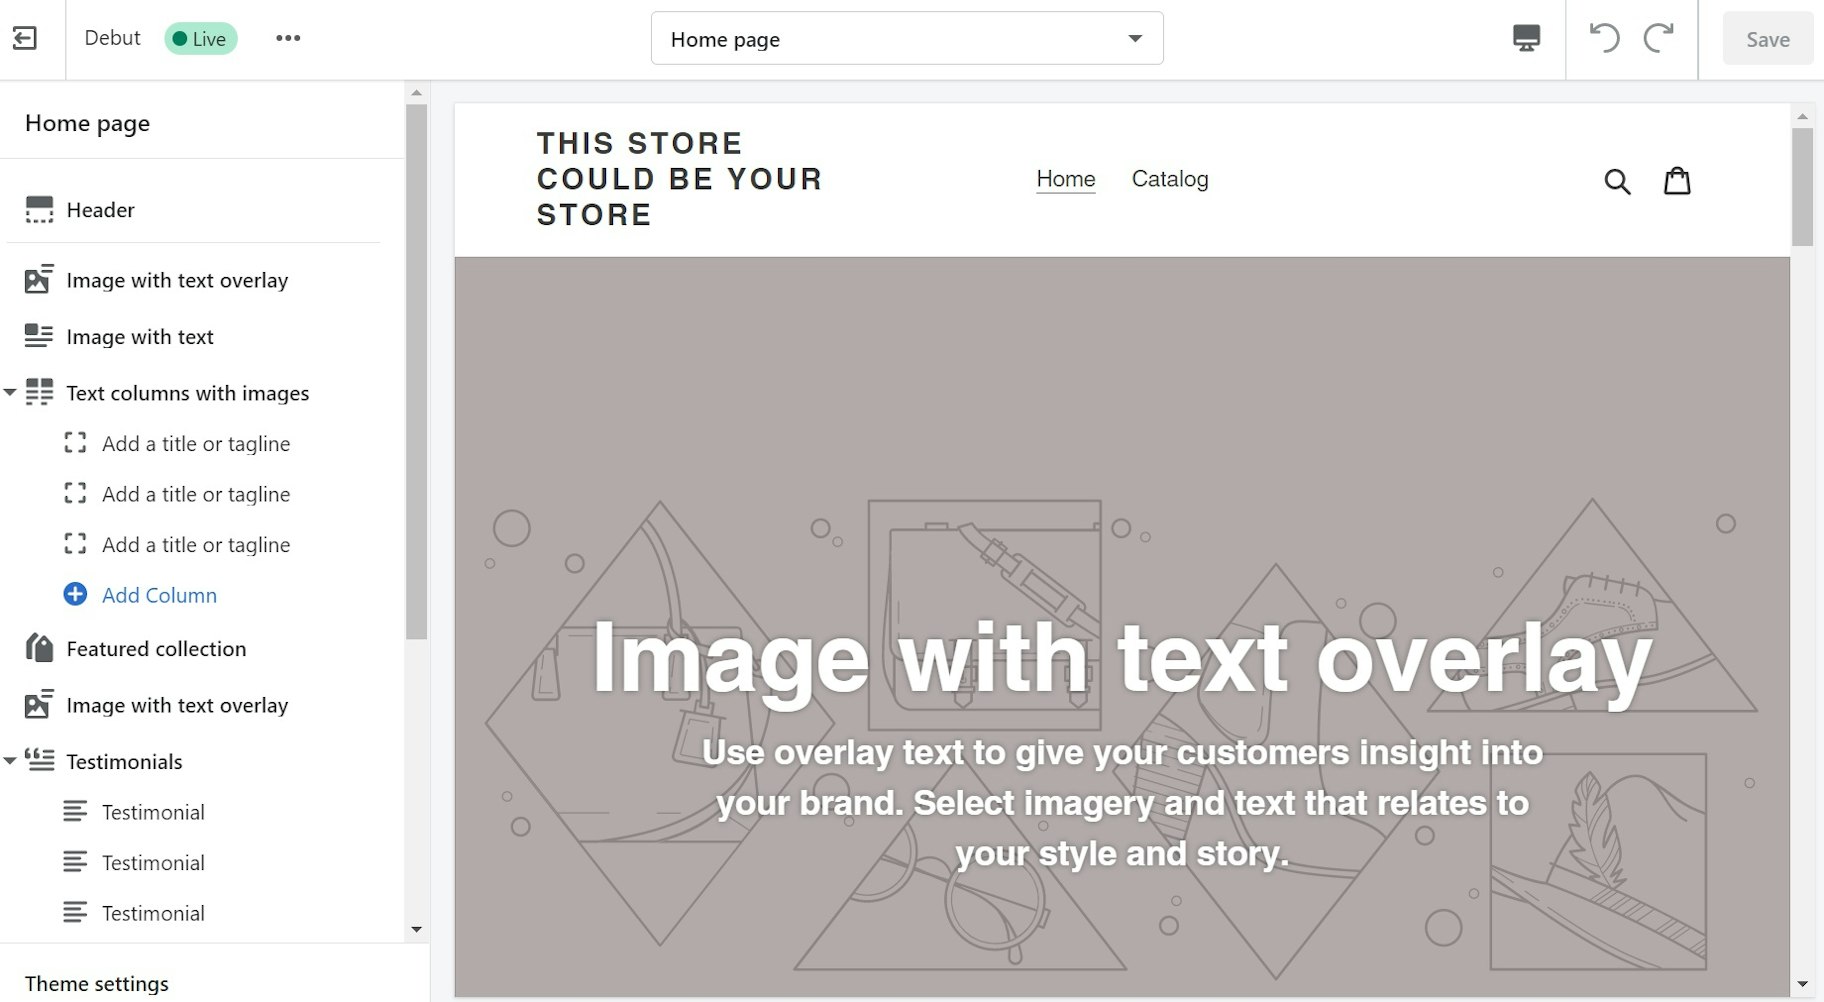
When you’re in the theme customization dashboard, scroll to the bottom of the left side panel and choose Theme settings.
Here, you can make sitewide changes that will permanently customize your theme. For example, you can make all of your headings a certain font or color (like #0CA224 green, for example).
You can also edit the elements like product suggestions, social media icons, and a checkout banner.
You’ll see that the top dropdown menu defaults to Home page. You can edit this page specifically or click through to each of your pages and customize as you see fit.
On each page, click the elements on the left side panel. Here, you can type in your text, upload your logo and images, change fonts and colors on each page individually, and tinker with other customizations.
The cool part is that you’ll be able to see all of your changes in real-time, so you can work as you learn how to set up an online store.
6. Set up Shipping Taxes, and Payments
In addition to all the beautiful front-end stuff, starting an online store means you’ll also need to have a well-oiled machine on the backend. Three major considerations for this are shipping, taxes, and payments.
Let’s look briefly at each one.
Shipping
Shipping is a big consideration for an ecommerce business. You’ll need to consider things like the weight of your products, customer destinations, packaging costs, and shipping carrier rates — and all these numbers need to be balanced with your profit margins.
You can edit your shipping settings under Settings > Shipping and delivery.
Taxes
Another big consideration is taxes and customs duties. Make sure you’re aware of the tax laws and regulations in your home country and region, as well as in the destinations where you’ll be shipping your products. For example, any packages you ship to the EU may be subject to new value-added tax (VAT) rules.
Edit your tax settings under Settings > Taxes.
If you’re unsure about your tax requirements and obligations, consider consulting or hiring an expert who can make sure you’re making the right moves.
Payments
And of course, you’ll need to set up payments as you’re setting up an online store. Can’t run a successful business without getting paid, right?
There are multiple methods you can collect payments from your customers, including:
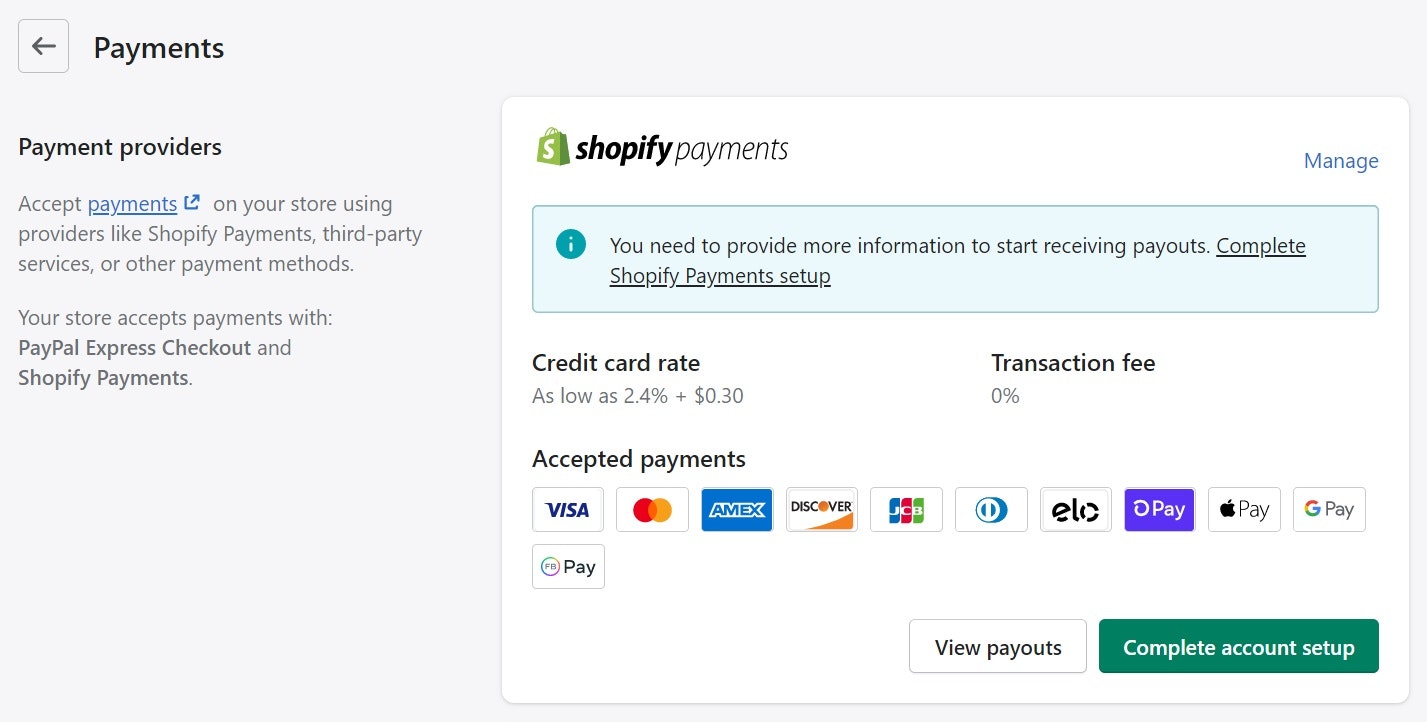
- Shopify Payments (which accepts major credit cards and other methods like Apple Pay and Google Pay)
- PayPal express checkout
- Amazon Pay
- Various third-party providers like Braintree, QuickBooks, and Windcave
- Alternative payment providers like Alipay, BitPay, and Klarna
- Manual payment options like bank deposits, money orders, and cash on delivery (COD)
To set up payments, go to Settings > Payments.
6. Make the Final Considerations
As you learn how to open an online store, you could add final touches for days to even months. The best advice here is to start with the bare minimum, and then keep learning and building as you go. (Otherwise, you may never launch!)
The following steps aren’t 100% critical, but they’ll add some nice finishing touches that will give your store that extra boost of professionalism, engagement, and trustworthiness.
Let’s look at some customizations to your checkout and email notifications.
Customize Your Checkout
Under Settings > Checkout, you can tweak the customer experience in a few ways, like giving them the option to create an account on your website or letting them checkout with their phone or email.
You can also use the checkout as an opportunity to let customers sign up for your marketing communications, which can have big benefits for improving your brand loyalty and customer retention.
Customize Email Notifications
Shopify has tons of features that make it easy to build a store online. One feature is pre-loaded automated email notifications (and SMS too) to inform customers of major milestones, like order confirmations and status updates.
Give these some extra love by adding your brand’s logo, colors, and fonts. You can also customize the text as another opportunity to inject your brand’s personality and keep your customers engaged.
Go to Settings > Notifications > Customize to edit the themes, then click each type of notification to edit the text.
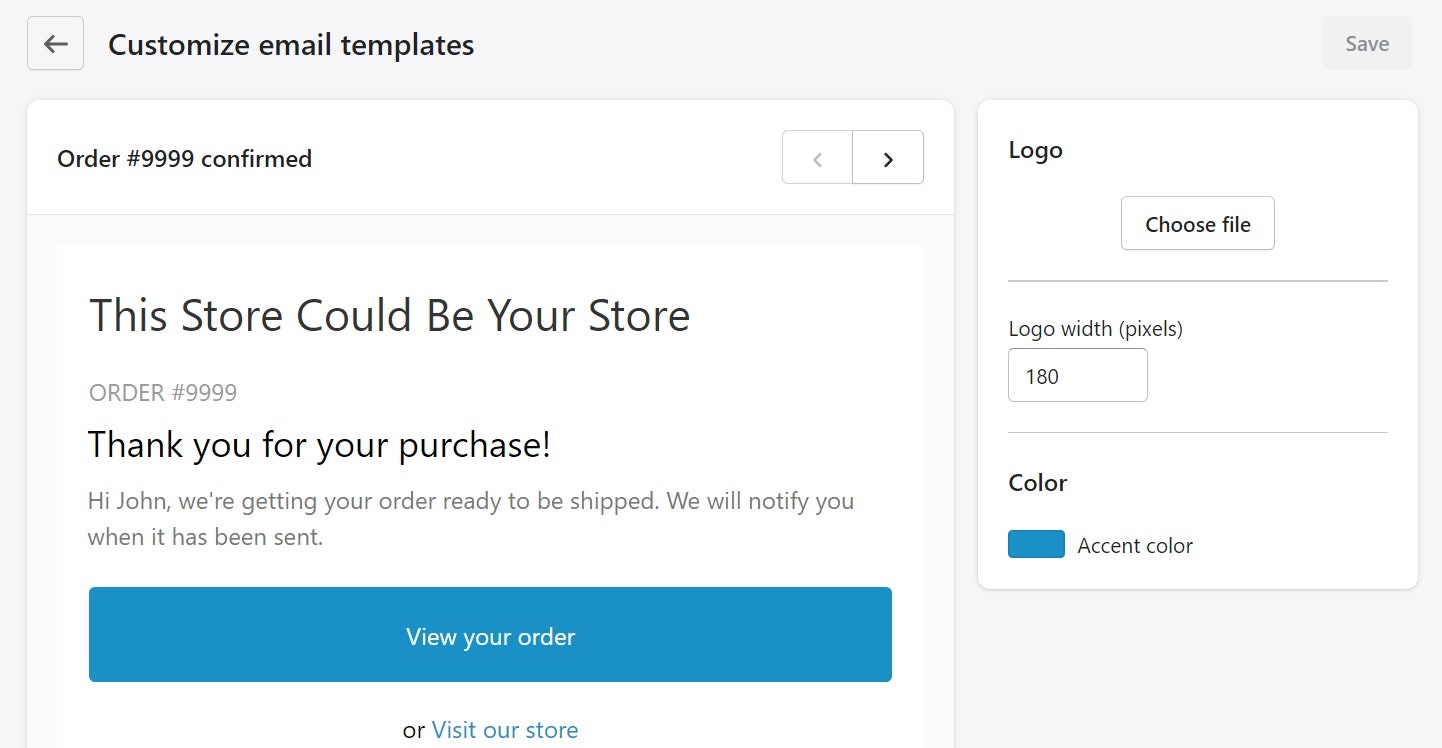
Be sure to set up abandoned cart emails, which are automatically sent to shoppers who add items to their shopping cart, but never finish the checkout process. These emails are a great way to recover a lost sale.
7. Launch Your Masterpiece!
Finally, your creation is ready to bring into the world.
Do a final run-through to make sure you have all your bases covered. Here’s a quick checklist:
- Do a test order to make sure checkout and payments work
- Check tax, shipping, and payment settings
- Make sure confirmation, order update, and abandoned cart email notifications are set up and customized
- Click every single link to make sure they work
- Make sure your store works smoothly on desktop and mobile
- Make sure your policy and legal pages are accessible from the website footer
- Show your social media icons prominently
Once you have all your ducks in a row, it’s time to purchase your Shopify membership and disable your store password.
Go to Settings > Plan and pick your plan (the basic plan is only $26 per month — start there if you’re new to ecommerce).
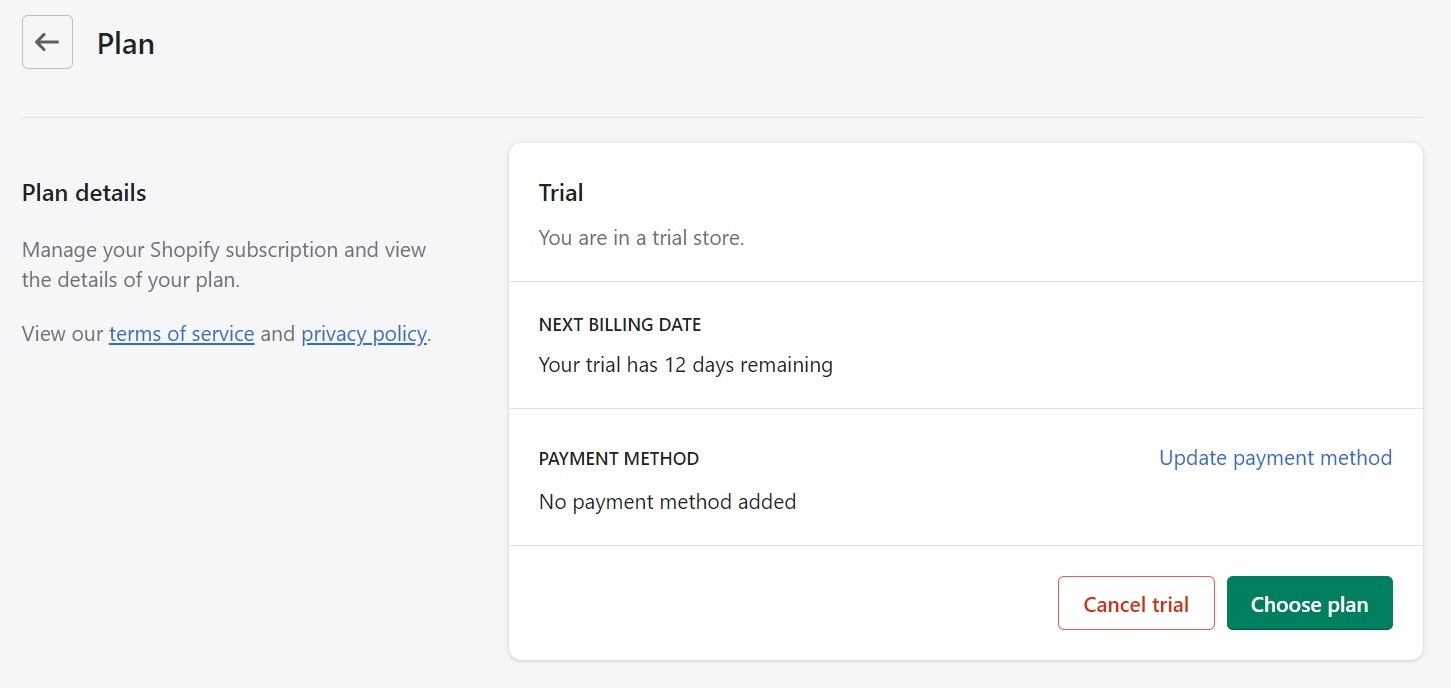
Once you’ve upgraded, go to Online Store > Preferences > Password Protection and disable.
Then, my friend, you’re ready to roll!
Opening an Online Store Is Easier Than You Might Think!
While many new entrepreneurs are intimidated by the thought of learning how to make an online store, it’s not so bad once you break it down into steps.
In this article, we’ve gone through all the basics to turn your ideas into a real-life money-making machine. All that’s left is to master the art of marketing so that you can generate traffic, get sales, and keep your customers coming back for more.
When you approach it with a learning mindset, you’ll always have room to build and grow.
Want to Learn More?
- 65 Best Shopify Stores for Inspiration in 2021
- 7 Best Free Shopify Themes For Your Online Store
- Shopify Dropshipping: Get Started With Our Ultimate Guide
- What Should You Sell On Your Shopify Store?


