From your first product to an established online store, your sampled merchandise has the potential to be a top-quality effort come to life. Now, you have to translate that effort digitally. One of the deciding factors for product sales is visual appeal through quality commercial photography.
Good product photos enhance your eCommerce store and legitimize your brand as a whole. For a print-on-demand merchant, designs can already have digital mock-ups, but factory blanks limit the full possibility of quality photos for a personalized store brand.
Your product catalog should present eye-catching and true-to-life photos to give customers reliable visuals when making a purchase. There’s no magic to taking a good picture, but the right techniques can improve your store’s chances of being noticed.
Photography is a value investment. Without hiring a professional photographer, you can still create your own product photos with a studio feel. This step-based guide will lead you through the tools and practices to develop unique product visuals from home.
How Can Good Product Pictures Increase Conversions?
Before reaching product pages, people already expect to know what they can buy.
Product photos represent the set of items you offer – link them in a language online commerce understands.
Good product pictures can increase conversions through higher visual appeal, managing user expectations, enhancing your brand value, and promoting an optimized eCommerce store.
Optimized Product Photos Enhance Your Store’s Reach and Traffic
Product photos drive traffic and add visibility, especially if Google has anything to say about it. Original images are more appealing to search engines.
Your own photos allow you to engage in multi-channel platforming. Consistent imagery in social media posts, advertising, and product packaging allows for more reach and a higher chance of making a sale.
This means knowing how to digitize your images. For instance, choosing larger images – which only work with high-quality photos – can increase click-throughs. A user experience A/B test case study showed a positive increase in traffic and sales when using larger images.
Images Are Reflective of Current Media Trends and User Experiences
The digital medium is becoming more accessible – easier to use but with competitive challenges. Customers are constantly keyed into minute-by-minute quality images. Their expectations are on-par for product photos.
Product photos can convey more by saying less. Website designs should manage mobile-friendly image layouts to increase user retention. Smartphones will naturally have smaller screens, needing more effort to scroll through long lines of text.
With most countries experiencing faster load speeds, visual data is outcompeting text. One of the main concerns of high-quality images is the effect on website load times. As internet speeds increase, online stores can support increased pixels without website latency.
Quality Photos Define Your Brand Value
Good photography represents quality products. Customers will trust what looks best and are quick to notice uninspiring templates.
Visuals are an unparalleled tool for branding that you shouldn’t overlook. Product photos with a sleek backdrop and appealing lighting will define first impressions and are vital for attracting the right niche of customers.
The visual appearance of your brand needs a consistent theme to be memorable. Create lifestyle shots with a direct audience in mind and work with styling – colors, backgrounds, and product arrangements.
Minor tweaks for quick-to-recognize products enable conversions in two ways: you’ll make a visually appealing website and ensure that your products are part of a whole, with intent and quality in mind.
People Process Images Faster
We are hard-wired for visual processing. In short periods, images are better at conveying meaning than text. Detailed and appealing photos pull customers over the boundary to keep them pinned to your store.
Dwell time appeals to search engine metrics, and a good photo can keep a customer invested. The first 10 seconds are critical for keeping users on your web page. Images hook a good eCommerce website, while product descriptions add the substance.
What Tools Do You Need to Take Good Product Pictures From Home?
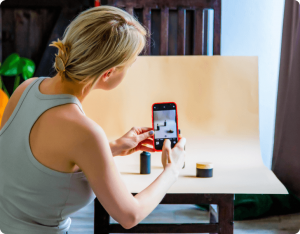
Good product photography begins with the practical know-how of choosing the right mix of layouts, backdrops, lighting, and camera techniques. If you learn what exactly everything’s for, you won’t overspend on unnecessary gadgets that do the same thing as everyday utilities.
Making a makeshift photo studio is technical but not inaccessible. If you know what to look for, entry requirements can be affordable.
Access to free image-editing tools – Canva, Photoscape, Pixlr, etc. – complemented with post-production tutorials lets you compete with studio shots without professional software requirements.
Remember that you’ll have to build a home workspace to create quality product photography. Here’s a list of what you should need:
- Camera
A professional camera is worth a chunk of your budget, but entry-level high-quality product photos don’t need much to produce results. You can do wonders with just your iPhone or a simple point-and-shoot camera.
The main point is that most digital cameras will already give you an excellent quality to work with, and the rest is up to composition, lighting, and post-production.
There are some advantages to a more expensive kit. A good DSLR camera will capture more detail with better camera settings:
- Multiple lens capacity (a wide angle lens is great for product photos),
- Shutter speed modes,
- Capture detail focus,
- Better light capture,
- Depth of field control.
Camera equipment is the essential item on this list, but no single camera will make a good photo on its own.
- Tripod
Tripods are often overlooked, but even a cheap one can last you for years. A reliable smartphone or screw-on camera tripod shouldn’t exceed $30 in eCommerce stores.
Holding a camera isn’t back-breaking work, but keeping a single angle for extended times will end up straining your progress. For multiple product pictures, you’ll lose consistency when holding the camera yourself, which can make your catalog look crooked and haphazard.
- Lighting
A product shoot needs a good and controllable light source. There are two options, natural light and artificial light. Each has specific strengths and weaknesses.
- Natural lighting
Natural light is free and reliable – especially if you’re working DIY. The best photoshoots are done midday and work well with:
- soft ambient light shots,
- outdoors shots with natural product backgrounds,
- photos with a person wearing or holding the product,
- thematic pictures that give more context for the brand.
You should avoid direct sunlight for inside shots since it can reveal imperfections and affect the contrast by reflecting against sleek surfaces. Covering blinds with thin opaque sheets allows more control over the intensity.
The perfect space for good product photography lighting should be next to large, well-lit windows with a clear and ambient wash of sunlight on your workstation. If you have skylights or floor-to-ceiling windows, they might be your best bet.
- Artificial lighting
The more long-standing option is artificial lighting. It gives you more control over when and how you take your shots. Note that artificial lighting requires more investment but can produce excellent results when done right.
The main tools for the job are studio softbox light kits. Two should be enough. For that, you will also need white foam boards that soften and reflect product sides evenly to mitigate harsh shadows. Get strong bulbs that produce a clear, white light without flickering.
Professional lighting is an added expense, but regular lamps will have inconsistent effects on the final photo.
To cover any external clutter and distribute a pleasant ambient light, you can make a light tent – also called a lightbox.
To make a lightbox DIY, you can construct a wireframe and cover it with recycled plastic or white paper for a softer glow. Place artificial lights on each side and close off the top and bottom. With natural light, you will need your lightbox in a well-lit space with many windows from multiple angles.
- Worksurface
You’ll need a solid and sturdy foundation that can hold a backdrop with enough space for your products. You can make a homemade one by just pushing a sturdy flat chair against a wall. If you need more room, there are cheap options – a portable folding table is great for a home studio.
Be sure to have room for different angles and varying distance shots without compromising the product arrangement.
- White backdrop
There are multiple options for a backdrop. You primarily use it to keep the focus on your product and make the editing process more manageable. Even a freshly painted wall will have slight imperfections that can be caught on camera.
Essentially, you’ll want a backdrop layer that rolls down from the wall to the surface in a seamless transition to create a clean background for item shots.
One flexible starting option is a roll of white paper that you can cut to size and roll out at will. They sell for as low as $10 on Amazon and can last you for multiple shoots and resizing.
If you want to do it DIY, an inexpensive option is to use a regular poster board or craft paper strung up with tape. It can let you mess around more, but it’s likely not to last as long.
Finally, you can also get a product photo stand. It’s more all-in but easier to set up without a table – especially if you want more freedom with lighting.
Make It Happen Today!
8 Steps to Take Good Product Pictures
You have the vision and the know-how. Now we’ll list the how-to in how to take product photos. Photography needs a good outline before a camera comes into the picture. We can divide product photography between set-up, adjustment, photoshoot, and post-production.
1. Set Up a Product
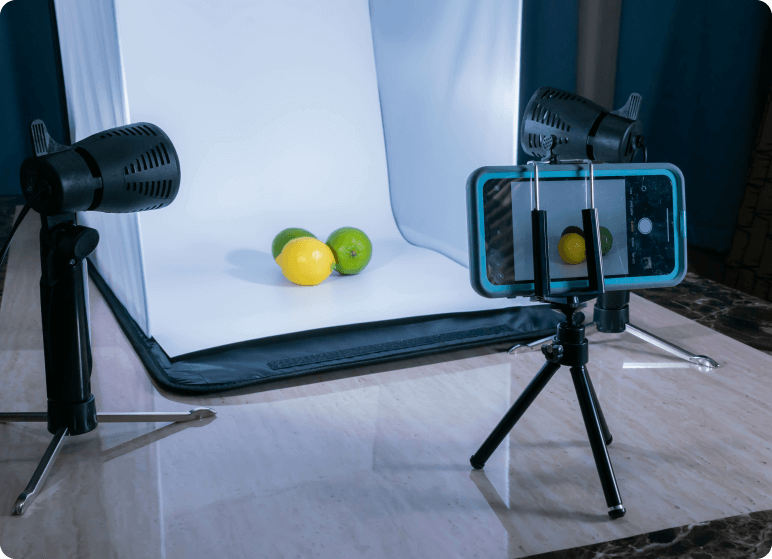
For a good arrangement, you need to decide on the type of photo for your product.
White background product shots are quick and easy to set up. Lifestyle and Reference photos need you to design a background that a customer can relate to and might require additional props and models. Each fills a specific need for your store:
- Single-item shots – every item should have a white backdrop photo for the purchase page and catalog. These make your design prominent and keep the product looking clean and established.
- Detailed shots – if you’re working with an intricate product, detailed photos can cover close-ups and focus on different sides and materials used. They fit well in product descriptions, giving a more transparent look.
- Full packaging shots – a customer wants to see what comes out of the package. These shots bridge the gap by showing the final product when delivered.
- Group shots – if you have an item set or want to give your brand a full cover photo for social media, a group shot is the most viable option.
- Lifestyle shots – show how an item looks in real life; you can present it with a model in front of a sweep or a thematic background.
- Reference shots – customers can’t judge an item’s size without something to compare it to. Putting your product in a still life background, preferably where customers naturally place it themselves, will do the trick.
For your print-on-demand apparel, make sure to iron or steam the product first. It might be helpful to fill the fabric with thin cardboard or paper to negate creasing, keeping your pictures consistent.
You can tape the product down, but don’t leave any adhesives visible. If you don’t want a flat shot, you can also invest in hangers, mannequins, or clothes stands.
For white backdrop shots, place the product in the center of the work surface to allow for multiple camera angles. Keep enough space so the picture doesn’t leave the backdrop frame.
Remember that even white background photos can have additional accessories to accentuate the product.
2. Set Up a Background
One of the most important first steps is putting your workstation in the right place. Try to push your surface close to a window, and don’t let any shadows pass onto the frame. Your product takes in a softer light with a closer natural light source.
If you’re using a chair, you can clamp the paper down on the backrest. Alternatively, you can tape it against a wall but keep the corners leveled. For a larger piece of furniture, you might need a stand-mounted backdrop – especially if your back wall doesn’t take in enough light from a window.
Let the sunlight fall naturally over the surface, so there’s a soft, gradual change in the horizon.
If you’ve made a light tent, line the back wall in the same manner. You’ll have to cut the backdrop neatly to size for a close fit.
3. Adjust the Lightning
If a backdrop is the stage, lighting’s the whole medium. A good light setup will make or break your project. Keep your adjustments clear, simple and always focus on your set, above all else.
- Natural lighting
For the perfect lighting indoors, keep your window perpendicular to the set. You can experiment with different angles between 90 and 45 degrees, taking note of where the product drops its shadow with each turn. A good sidelight should negate shadows, glare and keep your shooting space vibrant.
Turn off all house lights while setting up the product to reflect the end photo. Different colored bulbs will contaminate the shot and ruin the composition.
Be mindful of any other light sources that can change in between shots. Electronics, lights from the street, and changes in ambient light will damage your progress and image quality. You can mix in artificial lights if they seem necessary.
When shooting outdoors, set up in a space without any overreaching obstacles. Outdoor shoots heavily depend on the weather. If it’s unpredictable – cloud variations, rain, or wind – you might have to take additional precautions.
Always adjust the lighting right before the sun is at its peak to get the crispest quality during the shoot – it’s a time-constrained process.
- Artificial lighting
Place your lights evenly, with one acting as the primary light source and the other as fill lighting. Move your white foam board or a reflector card on either side of the set, catching the light as it moves past your product.
When using a lightbox, place the lights evenly on either side and experiment with intensity. You can cover the container with more paper to get a softer effect.
It might take a few tries to get the angles right. Record the arrangement so you won’t have to repeat the process more than once per session.
4. Use a Tripod & Adjust the Camera
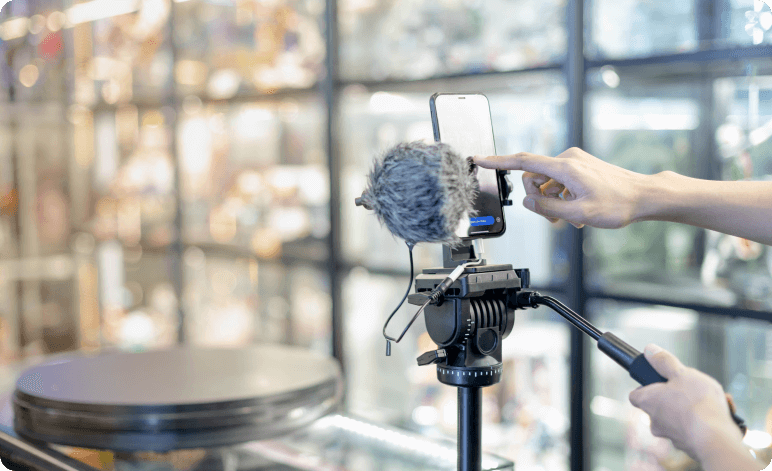
We’re moving on to many technical steps, but don’t get discouraged. Your settings don’t have to exactly follow our advice. In the end, you’ll be able to see your own work, fiddle with options, and make a unique result.
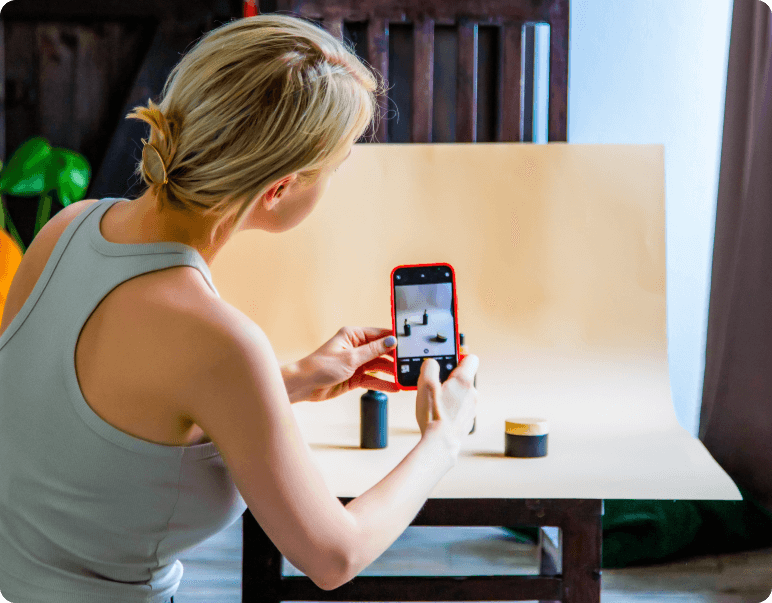
Place your tripod directly in front of the product, adjusting height and distance. Screw your camera in the socket and move the tripod until the screen captures the entire frame of the product. Make sure you’ve placed the tripod legs on even ground, correlating with your set level.
For a single-item shot, frame the product with a small open space for the top and bottom. You can later use that in editing to change any crooks or angle issues.
Angle the camera to reflect your intended perspective. If your gear allows it, try out multiple points of focus. Your customers will prefer dynamic shots where each side is clearly referenced.
- Eye-level shots – looking at the product straight-on.
- Low-angle shots – looking up at the product.
- High-angle shots – looking down at the product.
- Bird’s eye shots – looking at the top of the product.
5. Choose the Right Settings
Optimize images with your camera settings. Each camera is different, so you should have a guide for your specific model at hand. Settings have a lot of versatility, but you’ll need to choose specific ones for a still, high-quality image.
Here’s what you should be looking out for:
- Optimize your storage space – make sure there’s enough space for multiple product photos.
- Enable scene view grid lines – for a better framing; these will let you keep a leveled set.
- Turn off flash and color filter settings – your lighting setup will do a much better job minimizing exposure.
- Set image settings to the highest quality – either a raw setting or the highest jpg setting your camera allows.
- Set white balance to auto – the optimal setting for white backdrop photos.
- Set your lowest ISO option – this will determine how much noise your camera will let in. Keep it as low as possible to limit grain.
- Preset your zoom function – when zooming, always use optical zoom instead of digital for better quality.
- Set your exposure settings – for most cameras, you can go with Manual when taking a still shot. There are options for Aperture Priority if you have more professional gear.
Remember to use your own judgment when viewing the image preview yourself. A camera won’t preview the full quality before you view it later, so it might take a few tries to get it right.
6. Take Multiple Images of Your Product
This is your chance to put your work into practice. Make multiple shots of your product, taking photos with slight tweaks to the angle or settings as you see fit.
Start with a main still shot, but experiment with more unique angles – close-up shots, overhead shots, etc., as you proceed. The beginning might be rough, but multiple tries will show how well your camera setup can manage professional product photography.
It might take a while to make a quality shot, but you’ll have a better idea of what works best during photo editing. Before retouching, a good product photo should be well exposed with a light-gray background. If the product is well-focused, with soft shadows, and has leveled margins – not too off-centered – you should be good.
Upload your photos to a computer to view the full resolution image. It’s easier to inspect your work through a larger screen – your camera might not show the complete picture. Don’t worry if your lighting isn’t perfect.
Post-production makes all the difference. Your final image can be perfected using photo editing software. You’ll rarely have a perfect rendition from the start. Adobe Lightroom is the poster child of easy-access editing, but you can use whichever software you’re familiar with or able to get.
7. Edit the Pictures


For each product photo you’re happy with, you can now retouch and perfect it for the final image design. Upload your photos to the software one by one.
This step can be a considerable leap if you’re entirely new to photo editing. Your main goal should be to perfect your background’s white balance. Create an almost blank and clear medium without imperfections. Some shadows are alright, as long as they complement your product and keep focus.
You can experiment with contrast, levels, and shadow intensity, but try not to go overboard and lose sight of what made the original image great.
The real elephant in the room is managing your time and what you’re personally capable of. Don’t worry if retouching doesn’t produce the best results at first – this skill requires a lot of practical effort. You can always have your editing outsourced professionally, especially if you’ve saved the investment of taking the photos yourself.
Image editing companies like Pixelz, among others, can be an incredibly inexpensive option. You can have a standard, quality photo for a few dollars a picture without the technical hassle.
8. Optimize Pictures for Your Online Store
We briefly discussed how good product photography increases conversions for your online store, and now it’s time to put that into effect.
Before your catalog is done, your images need to be search engine optimized. This takes a lot of functions into account, but your first one should be optimizing load speeds. Have smaller image sizes to keep your image from completely lagging your website.
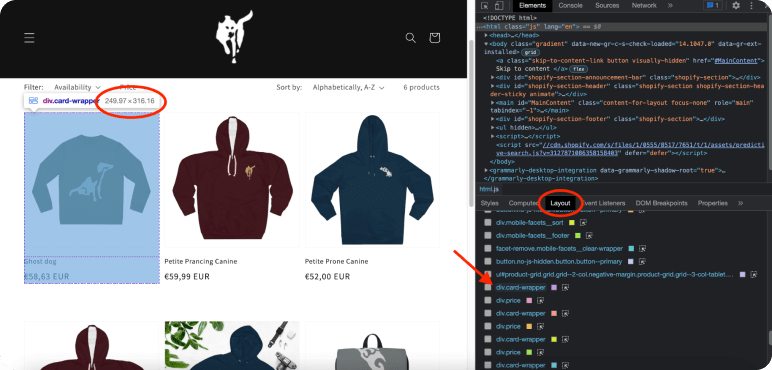
First, you’ll need to know what size image container you’re working with. You can inspect the image container size in your web store by right-clicking anywhere on the website and clicking inspect. This should open up a window with the website’s HTML source code.
There, you’ll see a list of every visual element on the page. Go to the layout tab at the bottom, and hover over each item on the list until your image container lights up. You should then see the pixel size at the top right of the container.
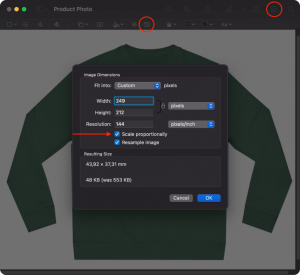
In the following visual guide of a makeshift Shopify store, you can see the end result. The product catalog thumbnail is set at 249.97 x 316.16 px:
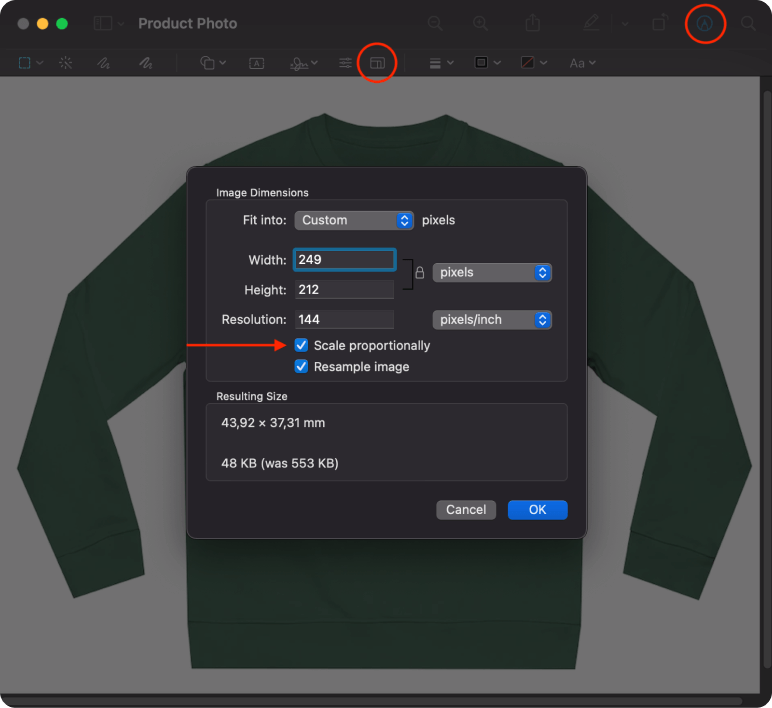
The easiest way to resize your image is through your built-in Mac Preview or Windows Picture apps, but there are also online options.
Take the size of your container – make sure to choose pixels instead of inches or cm – and use that as the metric. In order to keep the image quality, select your input to scale proportionally. It might change the height or width depending on your initial input. If the end result cuts your product borders, you will have to re-edit the initial photo to scale more proportionally.
You can stick with the precise size or take the pixel ratio up to 1.5. Save the image at 100% quality as .jpeg.
Then, compress the image to reduce the strain on your customer’s loading speeds. There are presets to save an image for a better web function in apps like Photoshop, but you can find a suitable alternative online. The main point of compressing an image is not downgrading it but deleting unneeded memory from the editing process.
Note that each image container, even with an identical product, has to be resized individually.
Don’t worry if it doesn’t work on your first try. Preview the page and see if the image fits nicely or needs another go through the cycle. There’s nothing better than seeing your work become perfectly incorporated.
Make It Happen Today!
Taking Product Pictures With Your Phone: Pro Tips
A phone camera is just as capable of quality product photography.
If you need a run-through, an android or iPhone camera has an average of 10 megapixels, which is about half as much as a DSLR. For catalog thumbnails, there’s not a lot of visible difference between the two.
Some settings are visible at the top of your screen, while others are accessed through the settings menu:
- Select the rear camera – the back camera is usually higher quality than the selfie camera. This will also let you view the image while taking the shot.
- Choose a 3:4 aspect ratio – this is a standard ratio for mobile photography. It will also help you during the editing and resizing process.
- Disable flash – the regular phone flash will overexpose the image and mess with the existing lighting.
- Set the white balance – tap the WB button and touch the white background of your photo, though it might not be available for some models.
- Align the exposure – tap the exposure icon and touch your product, so the camera knows what to expose.
- Center the focus – press and hold on your product to center the focus in the scene’s foreground.
Save them by locking the preset once you’re done with the settings. If you need your camera for other purposes in the future, you’ll always be able to reset them.
Remember to clean your camera lens thoroughly before use.
3 Best Apps for Taking Good Product Pictures
You can start editing your pictures directly from the smartphone. There are a few options you can choose from.
All listed items are available for both Android and iOS for free. You can, of course, browse your app store for unique free editing tools, but we’ll list the three free biggest hitters.
1. Adobe Photoshop Express
Photoshop’s become a verb people use when a photo is clearly edited, and it’s indeed the most common tool for digital artists.
Photoshop Express is a mobile-friendly version with all the necessary features for quick and easy photo editing. You can use it to adjust the image brightness, exposure, contrast, and hue.
2. Lightroom
The best thing about Lightroom is how much effort it puts into being a commercial photography app that provides a vibrant aesthetic.
Lightroom can be easily incorporated into the desktop version and extracted into a high-quality image from either device. It’s also simply exciting to experiment with the slider options and gradients to tweak your photos with complete expertise.
3. VSCO
VSCO has more options for applying filters and is best used for minor tweaks and enhancements.
The app is excellent for immediate social media integrations through the VSCO grid publishing platform.
Examples of Creative Product Photography
Creative product photography uses dynamic angles, thematic accessories, and a clear, intuitive message. Commercial photography is an art form as much as anything else. Treating it as a form of expression will make your process livelier, and that ingenuity will translate into customer loyalty.
It might be challenging to make a unique composition, but you can always find a source of inspiration online. Take a look at a few examples to get your creative juices flowing.
On a technical level, you can try:
- Dynamic poses/angles – for a unique digital brand idea, refrain from head-on standing shots of products. Play with the depth, composition, and space of your image.
- Macro shots – with a good camera focus, you can create a bold visual with a full-on macro shot for crisp detail.
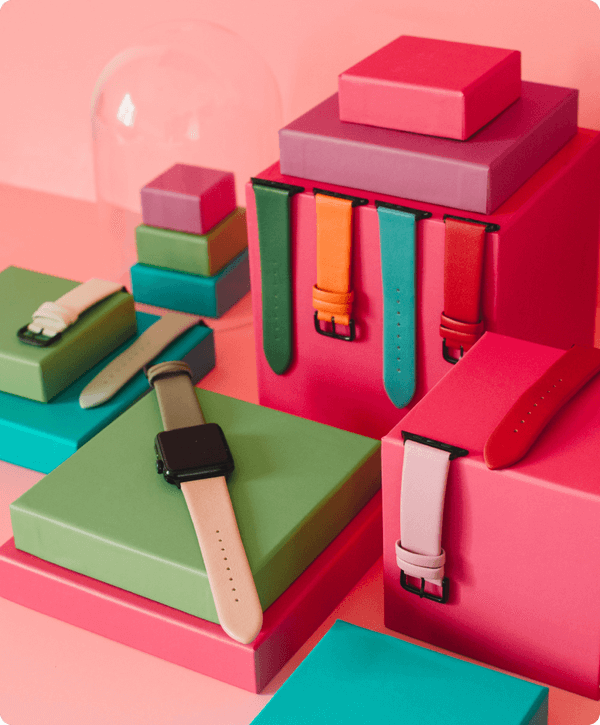
- Themed compositions – adding flare via props and a unique alignment can create a collage of colors and eye-catching accessories.
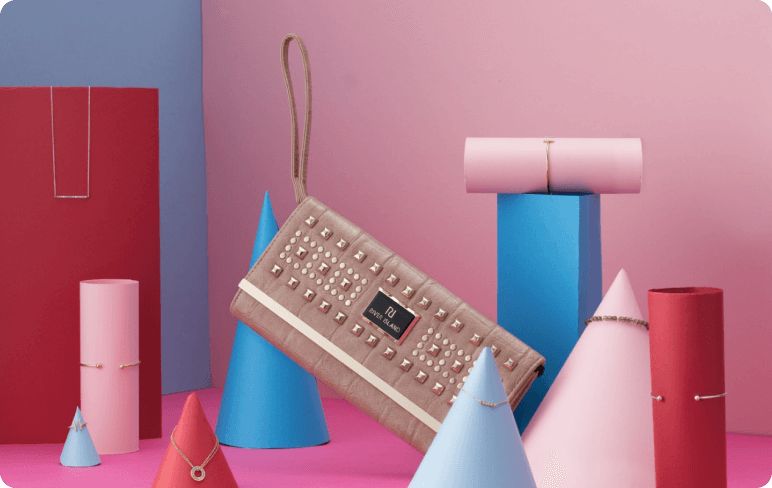
- Hanging shots – trickier to set up but making your products hang in the air with a dynamic flair adds a lot of action to your images, like a single still from a movie.
FAQ
How Can I Take Product Photos at Home?
For DIY product photos, all you need is a smartphone camera, a tripod, and a well-lit surface near a large window.
To start taking photos, place your product in front of a white backdrop and adjust your lighting to mitigate harsh shadows. Set your camera to the highest quality, with a high focal ratio, white balance, and low shutter speed.
Take multiple photos and upload them to editing software. To finalize the image, adjust contrast, hue, and saturation until you can efficiently finish with amazing images.
How Do You Photograph Products for an Online Store?
You’ve made a product and have a top-quality sample. Now, you need to take a photo for your online store. An online store needs a clear white background product photo to look professional for the purchase page.
For catalog photos, use a white backdrop – white sweep, poster board, craft paper, or product stand – and attach it to the back of your work surface. Use natural or artificial lighting when taking the photo. For artificial lighting, be sure to have reflective boards or a softbox for your light source, keeping the image in soft light.
When adding images to your store, make sure to resize as necessary after your edits. Use the resolution intended for your website layout – the size of the image container on the page. Optimize images through resizing for faster store load speeds.
How Do I Make Professional Product Photos?
Shooting product photos can be difficult at first, but with the right know-how, you can create a professional photo studio from scratch.
Invest in a camera and tripod to produce a good quality image with multiple angles. Get a kit of two artificial lights with a bright white bulb, foam boards, or a light tent. Create a white background sweep using any kind of clear paper material.
Practice setting up your product studio, adjusting camera settings, and taking multiple photos. Then, edit the contrast, hue, and saturation from one of the many photo editing apps available.
To Sum Up
We’ve transitioned to an online space where images and videos take up most of our attention. You are likely already getting your news and entertainment via video. Your customers will expect the same.
Let’s retrace the 8 steps to take good product pictures:
- Set up a product
- Set up a background
- Adjust the lighting
- Use a tripod & adjust the camera
- Choose the right settings
- Take multiple images of your product
- Edit the pictures
- Optimize pictures for your online store
Good product photography says a lot with little. Product photos are as much a visual aid as a branding opportunity, and you’ll need them for a successful eCommerce business.
Making a studio at home is possible with the right incentive. Once you’ve set up your lighting, backdrop, camera settings, and editing software, it’s time to shoot. Make your idea a reality.
Make It Happen Today!
The post How to Take Product Photos for Your Online Store appeared first on Printify.

